Tips & Tricks
The following is provided as general information only. If you need more specific cycling advice please contact one of the local bike shops.
Most people think that riding a bike is simple. A lot of these people learnt to ride a bike as a child and all they need to do is climb back on a bike and before long they will be rolling along as if they’d never stopped riding.
While it’s true that once you have learnt to ride a bike you will remember how to but there are a number of things that have changed since you were a child.
Following, you will find some tips and tricks which may assist you. These may make you more comfortable on the bike, or better able to use your bike so that you will improve faster and hopefully enjoy the experiences of cycling all the more.
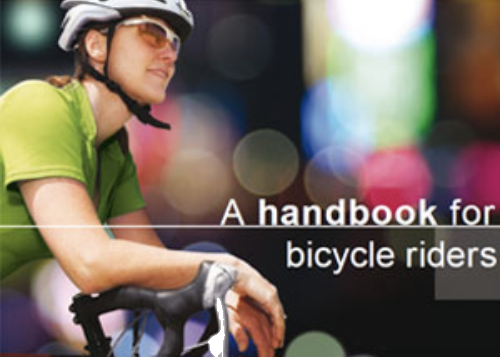
The NSW Roads and Maritime Services has produced a handbook for cyclists and other resources that you may find interesting and informative.
In "A handbook for bicycle riders" you’ll find tips on road safety, bicycle maintenance, road rules and the legal aspects of riding your bicycle. Click this link to access the Handbook.
In "A handbook for bicycle riders" you’ll find tips on road safety, bicycle maintenance, road rules and the legal aspects of riding your bicycle. Click this link to access the Handbook.
What Bike To Ride?
This is a very hard question to answer. There are so many different aspects to cycling these days that bring pleasure to the participant. Don’t be surprised either that your horizons change as you mature as a rider. Once what was unthinkable can become a goal after you have been riding for a while.
It is highly recommended that you visit a specialised bike shop. A list of the specialised bike shops in Wagga Wagga can be found here. At the bike shop you will find people that have had years of experience and once they have heard what you would like to do, they can recommend a bike that will suit your needs best. Try to resist letting the dollars speak too loudly. There have been plenty of people buy a cheap bike from a variety store that give up on riding. They have made the mistake of thinking that they might not like cycling so they will only buy something cheap. The fact is that it’s not that they don’t like riding, it’s that they don’t like riding that bike.
It is highly recommended that you visit a specialised bike shop. A list of the specialised bike shops in Wagga Wagga can be found here. At the bike shop you will find people that have had years of experience and once they have heard what you would like to do, they can recommend a bike that will suit your needs best. Try to resist letting the dollars speak too loudly. There have been plenty of people buy a cheap bike from a variety store that give up on riding. They have made the mistake of thinking that they might not like cycling so they will only buy something cheap. The fact is that it’s not that they don’t like riding, it’s that they don’t like riding that bike.
Consequently the bike sits in the shed gathering dust and cobwebs and the purchase cost is wasted. The adage “you get what you pay for” is very true. At the bottom end of the market the value for money rises very quickly. This means that for a few dollars more the quality of the frame and the accessories is far better. This means that the bike is lighter, changes gears better, or stops better. Money well spent really.
This doesn’t mean that you cannot ride an old bike. You can, and you can have lots of fun doing it. However, the better the bike you have the easier it is to ride and you will generally enjoy it more.
This doesn’t mean that you cannot ride an old bike. You can, and you can have lots of fun doing it. However, the better the bike you have the easier it is to ride and you will generally enjoy it more.

What to Wear?
The first thing you should consider is what you put on your head. In Australia you must wear a helmet that meets the requirements of the Australian Standards Association AS/NZ 2063. When thinking about your helmet consider how important your head is to you. How would you cope with an acquired brain injury? More importantly, how will the people that have to care for you cope with you with an acquired brain injury? Don’t think that if you are only going slow you will be all right. It surprises most people to find out that the majority of head injuries occur in low speed accidents.
Once you have your helmet take the time to ensure that it is fitted properly. It’s no point having the helmet on your head if it is not going to do the job properly if you have an accident. The helmet should fit squarely on your head. Don’t let your helmet expose too much forehead. If you can fit more than two fingers’ width from your eyebrows to the bottom of the helmet you need to adjust your helmet. A lot of thinking is done on the frontal lobe. Protect it.
Once you have your helmet take the time to ensure that it is fitted properly. It’s no point having the helmet on your head if it is not going to do the job properly if you have an accident. The helmet should fit squarely on your head. Don’t let your helmet expose too much forehead. If you can fit more than two fingers’ width from your eyebrows to the bottom of the helmet you need to adjust your helmet. A lot of thinking is done on the frontal lobe. Protect it.
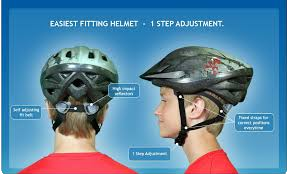
The chin strap should form a Y with the junction point just below your ear. If it a shaped like a V from under the chin it is likely to move backwards or forwards and your helmet will not be in the right position to protect you when you need it. The two-finger rule can be used to ensure that the chin strap is not too tight. You should be able to insert two fingers comfortably between your chin and the strap.
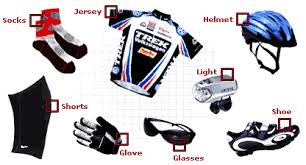
You can wear whatever clothing you like however your choices can make a huge difference to your safety and comfort.
From the safety perspective if you are going to ride on the road then think about wearing colours that make you obvious to other road users. Bright colours are the go. Steer away from darker colours especially those that blend in with the road surface like black, grey, dark blue, purple.
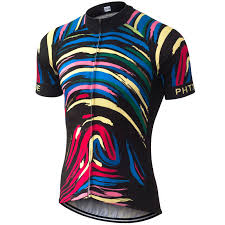
Do you have to wear the lycra and tight fitting cycling garments? Well, no you don’t, but these garments have evolved over the years and are designed to make you more comfortable. If you’re happy to ride in everyday clothing then do so. Many people commute to work in the “normal” clothing however if you are looking at riding for a long time then specialised clothing should be given a lot of consideration.
From the safety perspective if you are going to ride on the road then think about wearing colours that make you obvious to other road users. Bright colours are the go. Steer away from darker colours especially those that blend in with the road surface like black, grey, dark blue, purple.
Do you have to wear the lycra and tight fitting cycling garments? Well, no you don’t, but these garments have evolved over the years and are designed to make you more comfortable. If you’re happy to ride in everyday clothing then do so. Many people commute to work in the “normal” clothing however if you are looking at riding for a long time then specialised clothing should be given a lot of consideration.
Don’t be afraid of looking odd. Every sporting pursuit has its uniform. If you play netball you wear a netball uniform. If you play football, you wear a football uniform. If you swim, or row, or bowl you wear clothing designed for that sport. So, if you cycle, don’t be embarrassed to wear a cycling uniform.
The things that you should look at closely are the points where you contact the bike. These points are your hands, your bottom, and your feet.
You should protect your hands by wearing cycling gloves or mittens. These usually have some padding in the palm to help absorb vibration from the ground. In addition they offer you protection in the event of a close encounter with the ground. There is also a sun protection aspect too.
Your bottom, or rather, how sore your bottom is will have a very large impact on how much you enjoy cycling. Cycling knicks have been created to make your cycling life more pleasant. These have padding, generally called a chamois, stitched into them. This offers some absorption of bumps on the riding surface. Additionally though, the chamois absorbs perspiration and as these are stitched into the garment, they don’t bunch up. The result of this as that you are less likely to be chaffed.
If you are not happy to wear something that is tight fitting which reveals every bump and dimple then you can purchase what are known as shy-shorts. These have an inner into which the chamois is fitted. The shorts over the top hide the bits you consider unsightly.
It is very important that you do not wear underwear under your cycling knicks or shy-shorts. These are designed to fit closely to the body and wearing underwear defeats this. It will not take long to become accustomed to wearing just the cycling garment.
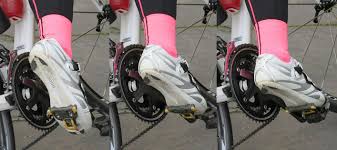
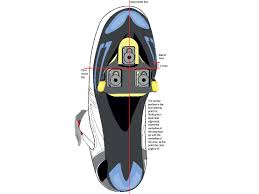
Now your footwear. Cycling shoes are designed to transfer the power from your legs to the pedals on your bike. This is achieved in two ways. One is that the shoes have mountings so that attachments can be placed on the sole that fit into clips on the pedals. The other thing is that the shoes are very stiff and have little absorption in them. This means that the power is not lost by the shoe soaking it up.
Many people new to cycling use their running shoes. These shoes look sporty but are not the right choice for cycling. The shoes are designed to absorb the weight of the runner as their foot strikes the ground. On a bike you want this energy transferred to the pedals.
Do you have to have the expensive cycling shoes? No, you don’t, but again there are benefits to be gained from using them. If you choose not to use them then try to pick shoes that have a stiff sole.
If you use lace up shoes then take a second or two when you’re doing them up. Tie off the laces on the outside of the foot, and make sure that the loops are not long enough to get caught in the chain ring.
How about the cycling jerseys? What do these have to offer? Well, these usually are made of a special fabric that is designed to wick away perspiration leaving you drier and more comfortable. Fabrics that retain the moisture can cause you to become cold. The moist fabric can also be a cause of chaffing.
The jerseys usually come with rear pockets. This allows you to reach items that you may need without having to stop the bike and ferret through a bag to find what you need. You can carry some pocket food to keep the engine fuelled, a small bottle of sun-screen, some money, your mobile phone, and perhaps some form of identification, any number of things really.
It is highly recommended that you have some eye protection too. Your eyes are very sensitive and being hit in the eye by an insect or catching a bit of dirt can be very painful. Wearing sunglasses during the day and, if you ride at night, some clear-lens glasses can protect your eyes.
What Should I Take?
What you take with you will depend very much on how long you intend to be out there. However there are a number of items you should take with you.
You should bring a pump. Make certain that the fitting is set to the valve type you are using. The pump can normally be fitted to the frame of the bike. There are any number of pumps available.
You should take at least one tube that fits your wheels and tyres. There will be a placard on the tyre sidewall that tells you what size it is. Take a look at your valve too. There are two types, the Schrader valve and the Presta valve. The Schrader value is the same as a car tyre valve. The Presta is smaller in diameter. If your wheels use the Presta valve system they may require a longer stem if you have deep rims. Your spare tube needs to be the correct size, and have the right valve type, and length if it is to be useful. You should inspect your spare tube regularly to check that it hasn’t been damaged by rubbing inside the bag it’s carried in.
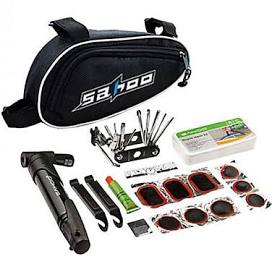
Take some tyre levers too. These are used to help you remove the tyre from the wheel’s rim if it is very tight. Hopefully you will not need them to put the tyre back on once the tube has been replaced. It is best if you can roll the tyre back onto the rim. Be very careful if you do have to resort to using the levers to get the tyre back on as you may accidentally pinch the tube doing so creating a hole in your fresh tube. A tip to help you get the fresh tube bedded into the tyre is to inflate it a little to give it some shape.
A puncture repair kit can be a useful item to carry too. A repair kit will contain patches, glue and an abrasive tool. Once you have found the site of the hole you clean around it using the abrasive tool. Wipe it clean and then apply the glue. Allow the glue to cure, or go off, before applying the patch. Rub it with the end of a tyre lever against something hard to help ensure a good contact. Check your tyre by running your finger around the inside. You are looking for the item that has pierced the tyre and tube causing your puncture. You may not find anything as the item has gone in and out. If you don’t check though, and the item is still in the tyre, you will have another puncture before long. Another thing to look out for is your glue. Once opened the active agent in the glue can evaporate so that the glue no longer does its job. If your glue has been opened for a while then it’s quite likely to be off. Get yourself a fresh tube.
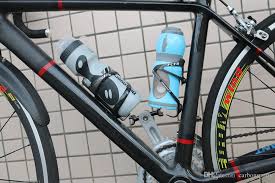
Make sure you take water. Most bikes have mounts where a cage to hold a bottle can be fitted. Make certain when looking at purchasing your bike that the mounts are located where you can reach them while riding along. One of the big mistakes riders make is not drinking enough. Drinking small amounts frequently is the way to go.
If you are going for a long ride then take some food with you. You don’t have to use the sports gels and bars that are available. You can use anything that is small enough to fit in your pocket. Bananas are a favourite. Pick something with a low Glycemic Index so that the energy is released slowly. If you use high sugar foods you will get a big hit but suffer a big low afterwards. If you use wrapped bars a tip is to split the wrapper before you put it into your pocket. You will find it a lot easier to unwrap the bar while you are riding along.
In case of emergency you should take a mobile phone with you if you have one. You may find yourself stuck on the roadside having used all your spare tubes. Or the weather may change so that it is no longer safe for you to be on the road. Being able to call a friend to pick you up can be a lifesaver.
Don’t forget your sun-screen and any medications that you may need.
Carrying a light raincoat may be a good option too if you have room. It may be handy when you are on the side of the road to keep the wind off you while you change a tube.
Don’t forget to bring some cash or your 'plastic money'. This is especially necessary if you are riding with a group as you are sure to find a cafe somewhere that serves good food and coffee or cold drinks on a hot day.
It is also wise to carry some form of identification especially if you are riding alone. Even if you are riding with friends it can be handy for them in the unfortunate event that you have an accident.
What To Do Before Riding?
You should check your bike to make certain it is roadworthy. Check that your brakes work. Check that your gears change properly. Check that nothing is loose. Check that the steering isn’t too loose or too stiff. Check that your tyres are inflated to the correct pressure. You will find this information generally on the tyre sidewall. Fill up your water bottles. Make certain you have your spares and tools.
Riding Tips
Many of us learnt to ride on single speed bikes. When we get a new bike it has all these gears and most of us don’t know how to use them properly. If you are unfamiliar with gears don’t hesitate to ask at the bike shop for a demonstration.
You should not be afraid to use your gears. Gearing was invented to make cycling easier. The easier it is the longer you can do it, the further you can go, and the less time it takes to recover. Gears are good. Use them. As you get stronger you will be able to ride more comfortably in higher gears.
The idea is to maintain your pedaling speed or cadence at the same rate and to change the gears up or down so that you can. Sometimes this will mean that you go faster, and other times you will go slower, but effectively you are using the same energy output.
If you are confronted by a hill change into a gear that you think you can ride the whole hill in. If, towards the top, you are feeling good, you can change up a gear or two to go faster. If you are going downhill or have a tailwind you can crank up the gear as it is easier to push.
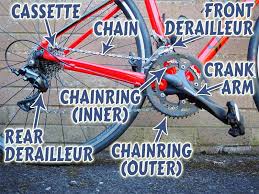
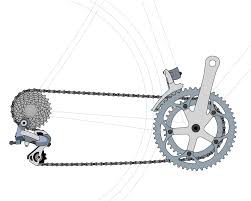
A note on gears. Most bikes have one, two or three chainrings at the front. At the rear there can be anything from six to ten cogs. These are generally external gears although internal gears, or geared hubs, are now becoming more popular. You have levers to change the gears at the front and the back. Moving the lever one way makes it harder to pedal. On the front this means moving from the smaller chainring up to a larger one. On the back this means moving from a larger cog to a smaller one. Moving the lever the other way makes it easier. It will take a little practice initially to work out what you need to do to get the desired effect.
If you have three chainrings and a nine-speed cluster on the back you supposedly have 27 gears (3 x 9 = 27) to pick from. You can use all nine gears at the back with each of the three chainrings at the front but this is not recommended. You should try to keep your chain as straight as possible. To use certain gears the chain is bent and when the chain is bent a greater friction load is placed on it. This means that your energy is being absorbed bending the chain rather than propelling the bike. Also, this additional friction leads to faster chain wear, so keeping your chain as straight as possible leads to longer chain life.
If you have three chainrings and a nine-speed cluster on the back you supposedly have 27 gears (3 x 9 = 27) to pick from. You can use all nine gears at the back with each of the three chainrings at the front but this is not recommended. You should try to keep your chain as straight as possible. To use certain gears the chain is bent and when the chain is bent a greater friction load is placed on it. This means that your energy is being absorbed bending the chain rather than propelling the bike. Also, this additional friction leads to faster chain wear, so keeping your chain as straight as possible leads to longer chain life.
Divide your rear cluster into thirds. If you have a triple chain ring on the front use the bottom two thirds (the largest) down at the rear on the very small ring at the front. In the middle chainring use the middle two thirds and use the top two thirds (the smallest) up on the big ring.